12 Days of Christmas: Snowy Nails Tutorial

12.24.2012


Today, on Christmas Eve, my friend & graphic designer extraordinaire Dana, is sharing her ADORABLE snowy nails DIY with us today for the last 12 days of Christmas post! 

Dana is very talented in so many different areas, she is never afraid to try new things, always willing to help me & has an amazing blog you should definitely add to your reading list! 


Her snowy nails tutorial was so adorable & easy I had to ask her to share it with us!  I never knew you would use newspaper clippings to create such adorable nails! This will be a must try for me! 

Head over to Dana's blog for the full tutorial & paint yourself some festive Christmas nails for the big Day tomorrow! 

Happy Christmas Eve Everyone!

“The virgin will conceive and give birth to a son, and they will call him Immanuel” - Matthew 1:23

Photobucket

12 Days of Christmas: DIY Gold Tipped Feathers

12.19.2012


I think these gold tipped feathers are just gorgeous!  I am pretty sure I need to make a bunch to decorate with! Plus, they would be a great gift topper with some pretty gold foil wrapping paper! 


Such a simple & inexpensive way to make some pretty, sparkly decor.  Glitter & sequins are my newest obsession! 


Here's the scoop:


SO pretty! 

A big thank you to Jenna, my DIY contributor for putting together another great DIY project! 

Find Jenna: Blog // Facebook // Pinterest
Yesterday I showed you my Christmas Mantel, be sure to check it out if you missed it! See all the 12 Days of Christmas Posts here.

Photobucket

12 Days of Christmas: My Christmas Mantel

12.18.2012


I love my mantel! When I got it this summer, I was already thinking of how I could decorate it for Christmas. 


  Then when I decided to paint the mantel mint, the first thing that popped into my head was how will my Christmas decorations look sitting on it? 

No joke, I really thought that.  

But, since I'm not really into the traditional red & green colors of Christmas, I decided all would be okay.


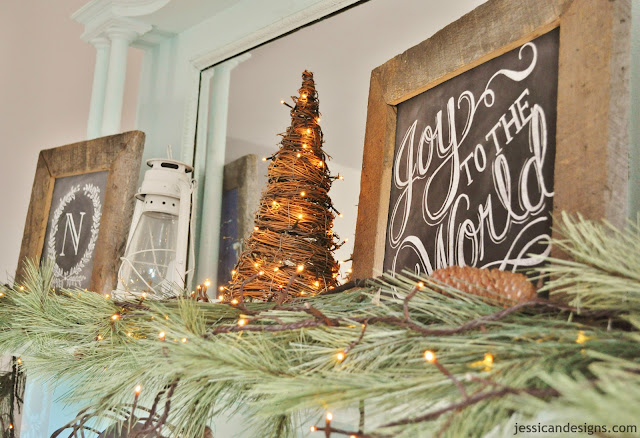
I LOVE how our mantel looks! It reflects my style & the warmth I feel during Christmas time.  I get a cozy, happy feeling sitting in the living room at night with the twinkle lights a-twinkling. ;)


What's on my Mantel:

♥ Reclaimed barn wood frames from Old Red Barn Shop, which happens to be my Brother in Law Ian's shop! I SERIOUSLY love them! I have 2 more in my home & 3 more on order for our bedroom! 

♥ Chalk board Art from Lily & Val. I love our monogram N, that will stay up there all year! And the Joy to the World print is one of my favorite Christmas decorations I have ever had! (I also have the Baby it's Cold Outside & May all your days be merry & bright prints...I love them all!)

♥ Pine Cone Garland, Cone Tree & twinkle lights (LOVE twinkle lights) from R Classic Elements, a local store owned by my Mom's Friend Renee. 

If you have missed any of my 12 Days of Christmas posts, you can check them all out here

Only 7 days left until Christmas!


Photobucket

12 Days of Christmas: Christmas Side Dish Recipe

12.17.2012


Hi there, I'm Gina. Full name Regina. Call me either - I don't mind.

My blog is a little about what inspires me, a little about the handmade community/my business, and a lot about my life.

I am here today sharing a Christmas side dish recipe! Hope you enjoy!


For most of my life I thought I hated brussels sprouts.  I used to cry when my mom would put them on my dinner plate.  {Yes, I am a tiny bit dramatic ;).}

About a year ago, I tried roasted brussels sprouts topped with a little balsamic vinegar glaze and fell in love.  I have no idea why I was hating on these little yummy bits of green goodness for so many years!  

I cannot get enough roasted brussels sprouts and today I am going to show you a super simple jazzed up recipe that will make the perfect side dish or appetizer at your next holiday meal.


Roasted Brussels Sprouts with Balsamic Glaze and Goat Cheese
-1 pound of brussels sprouts, cut in half or quarters if the sprouts are large
-1 tablespoon of olive oil
-salt and pepper
-1/2 cup balsamic vinegar
-2 tablespoons honey
-goat cheese {optional - if you are not a goat cheese fan, try parmesan cheese}

1. Set the oven to 375 degrees and cut the brussels sprouts in half or in quarters if they are large pieces.

2. Place all the brussels sprouts in a glass baking dish and drizzle with the olive oil.  Toss to coat the pieces and sprinkle with a little salt and pepper.  Roast the brussels sprouts in the oven for about 45 minutes.  They are done when the pieces are fork tender and have nice crisp brown edges.


3. About 3 minutes before the brussels are done cooking, put the balsamic vinegar and honey in a small sauce pan.  Heat over medium-high heat and stir all together.  One the mixture comes to a boil reduce the heat to low and allow to cook for a minute so the mixture can reduce down to a nice syrupy sauce.

4. Remove the brussels sprouts from the oven, put on a serving platter and drizzle with the balsamic and honey sauce.


These sprouts are great as is, but if you want to make them extra special, top with crumbled goat cheese or thin slices of fresh parmesan.


If you think you are a brussels sprouts hater, try this recipe and get back to me :).

Enjoy!

Find more recipe, diy, and life in general posts on my blog, {Acute Designs}.  Happy Holidays! xo, Gina

Be sure to check out more, including my Winter StyleDIY mason jar snow globe & Marshmallow & Cranberry Garland!

Photobucket

12 Days Of Christmas: DIY Wine Cork Christmas Tree

12.13.2012


Wine Cork Christmas Tree


Hi! I'm Lindsay of Pen & Paint. I'm a happy wife & busy mama of 2 silly little boys. I love to create. You'll find me with pens & sketchbook in hand or paint all over my clothes. My shop's filled with happy, handmade artwork and paper goods.

One thing I love to create outside of my shop is Christmas decorations for our home.

Every year I try to make something new. One of my absolute favorite Christmas decorations is a wine cork tree I created about 7 years ago. I found the idea in a Martha Stewart magazine. 

Last year after saving up wine corks I decided it was time to create another cork tree. 


Make it happen:
You need a large Styrofoam cone, a hot glue gun, 
a knife that will cut through cork, and about 85 wine corks and one champagne cork.

Starting at the bottom hot glue each cork vertically to the cone 
until you make one row.

Change it up and hot glue two rows horizontally.
Continue until you have reached the top.

Hot glue a champagne cork to cover the top of the cone.

Because each wine cork is different you may end up with a gap in your row. You can take a sharp knife and cut a cork to fit the gap, or if you are like me you can just leave the gap and make sure the tree is angled just right on your mantle so no one can see it.


Most likely you are not going to have 85 corks lying around... unless you are like me and like to hoard save them for craft projects. If you don't have enough now, you can start saving for next year, and have your  friends save their corks too. OR you can now buy decorative wine corks at Target (near the candles) and I'm sure craft stores are carrying them. You never know when you might need to make something out of corks.


I hope y'all have a wonderful Christmas and a creative New Year!
Come say hi! Oh, and take 15% off your order through December 14th with the code HELLO15

Come say Hi:
'

Be sure to check out more, including my Winter StyleDIY mason jar snow globe & Marshmallow & Cranberry Garland!

Only 12 more days until Christmas!


Photobucket
CopyRight © | Theme Designed By Hello Manhattan